
Learn how to make decoupage wood ornaments for Christmas. These DIY
How to Make Decoupaged Ornaments. Apply the mod podge in small sections on the ornament. Attach the fabric squares. Repeat process until the ornament is covered. Allow to dry completely. Apply a second coat of Mod Podge and allow to dry overnight. If desired, apply decorative embellishment with the glue gun.

Pin on CHRISTMAS
2. Chinoiserie decoupage ornaments. Embrace a new Christmas decorating theme with a touch of chinoiserie elegance. Discover how to craft DIY decoupage Christmas ornaments with this project by This Dear Casa. Using blue and white floral multipurpose paper from Paper Source and delicate paper napkins, apply Mod Podge to adhere the paper onto ornaments.

diy vintage picture and dictionary ornaments Christmas decoupage, Diy
Step 3. Add mod podge. Cover the ornament with a layer of mod podge. I like to use foam brushes. They are cheap and work great! Step 4. Attach image. Place the image onto the ornament and press lightly to adhere. A super helpful tip for decoupage is to use plastic wrap to secure the image and remove any wrinkles.

Decoupage Christmas Ornaments / Winterwood Decoupage Christmas Ornament
Create beautiful Christmas ornaments for your tree using Decoupage Queen rice paper, moulds, paint and Diamond Dust. See all available Rice papers from Deco.

Decoupage Christmas Ornaments / Pin by Niki Sk on Nikis decoupage
Trim paper and glue a new piece of paper onto other side. I debated wrapping the napkin and paper all the way around, but decided it might look cleaner to cut two separate sections. This is especially helpful with thicker paper to help prevent bulky creases. Let the Modge Podge dry for 24 hours, then cover paper with thin layer of Modge Podge.

23 DIY DECOUPAGE CHRISTMAS ORNAMENTS
This video is a tutorial on how to make Spectacular Christmas Ornaments. The supplies needed are: ️ Rice paper 45350 https://aistcraft.com/decoupage-rice-pap.

decoupage Christmas ornament DIY ideas decorations craft tutorial YouTube
Time needed: 30 minutes. How To Makeover Ball Style Christmas Ornaments. Gather Ornament (s) and Supplies. Place everything on a work surface covered with newspaper. Line box or tray with a sheet of paper. This sheet of paper will be to catch excess glitter so you can reuse it. Print Free Printable and Cut Into Strips.

Christmas decoupage, Handmade christmas ornaments, Christmas ornaments
Place a wooden Christmas tree ornament on the wrong side of the tissue or wrapping paper. Trace with a pencil. Cut out the tissue paper (or wrapping paper) tree. Pour out some mod podge onto a paper plate. Using a sponge paintbrush or roller, cover one side of the tree evenly with the mod podge.

Decoupage Christmas Ornaments (I want to try make some ornaments look
Instructions. Cut your fabric into manageable bits using the scissors. Add Mod Podge to the paper mache ornament - place a piece of fabric down and then brush over it to smooth it down. Repeat, continuing to add Mod Podge and place more fabric squares. As you cover one side of the ball, let it dry.

Christmas Tree Decoration Decoupage Ideas DIY Christmas decoupage
Watch and learn how to make this beautiful Decoupage Christmas Ball! Christmas home decoration idea.For this Decoupage Christmas Ball you will need: one styr.

Decoupaged Christmas ornaments Eccentricities by JVG Christmas
Peel apart the layers of the decorative napkin, and discard the bottom layer (the white piece). Cut a small square in the napkin, just a bit larger than the wood round. If there is text on the napkin, be sure to center this cut over the text. Apply a layer of decoupage glue over the white paint.

DIY Decorative Ornaments Reader Feature Diy decoupage christmas
Bronner's shows you how to make a simple decoupage ornament in this DIY tutorial! Choose any patterned paper to fit your interests! (Comics, Bible verses, sh.
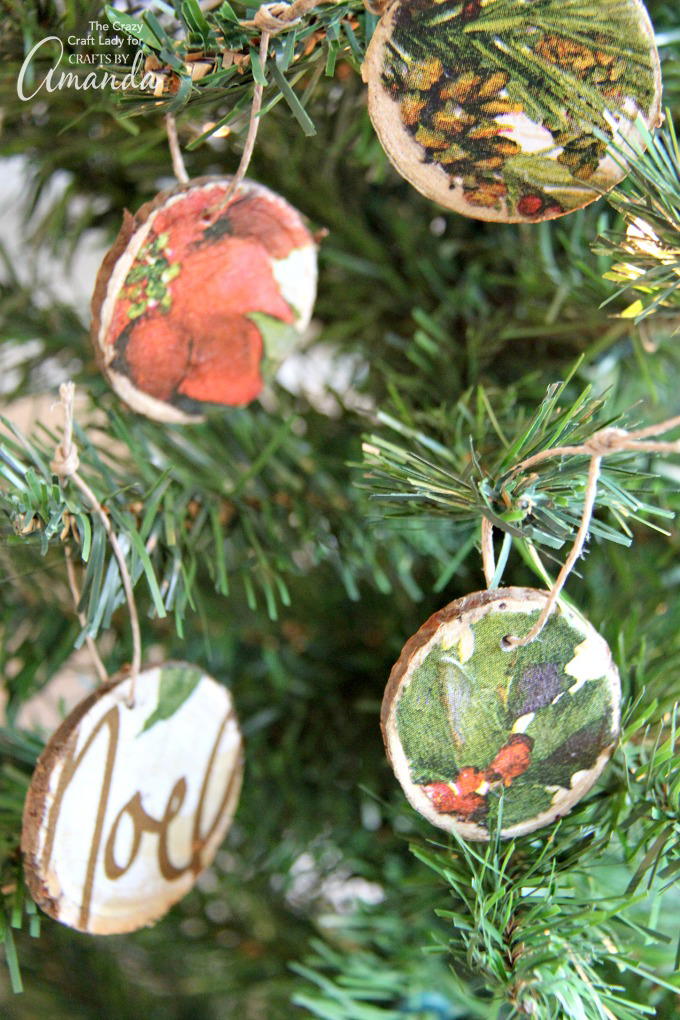
DIY Decoupage Wood Slice Ornaments
How to Make these DIY Ornaments: Apply a thin layer of glue in small sections on the ornament. Attach the fabric squares or your small pieces of paper. Repeat process until the ornament is covered. Allow the decoupage glue to dry completely. Apply a second thin layer of Mod Podge and allow to dry overnight.

Decoupage ornaments, why didn't we think of this?! Christmas crafts
After the paint has dried, apply a thin layer of decoupage glue to the wooden ornament. (Thicker papers need extra glue.) Attach the image, smoothing the image as you work. Apply extra glue under the edges if needed. Apply a thin layer of glue to the top (while the bottom layer is still wet.) Let it dry and repeat the steps for the back.

Pin by nie on decoupage Christmas decoupage, Diy christmas ornaments
Hey y'all! In this video, I'll show you how to make these cute decoupaged fabric Christmas ornaments.My FAVORITE glue gun (aff link): https://amzn.to/2MPpUav.

DIY Decoupage Ornaments with Free Printable Craft My World
You can easily obtain free oyster shells from seafood restaurants to make oyster shell crafts. However, you need to take precautions before using them for a craft. Begin by washing in soapy water and remove any meat from the shells. Then, rinse and add them to a mixture of 1 part water and 1 part Clorox. Allow the shells to soak for several.